Image Map

Wednesday, 28 January 2015

How to create the 'no makeup' look.

Ever looked at celebrities who look depressingly good without makeup? I have news for you a lot of the time it is makeup, it's called the no makeup-makeup look ,it usually consists of more products than a full on glam look, however I have tried to use as little products as possible; to make this look affordable so you can  look like a 'naturally' purdy girl. This look has been forecasted as being very much in for the summer seasons, it's an easy holiday and festival look.


As seen at the SS15 Celine show.


Product list.

  • BB cream. Elizabeth Arden
  • Concealer. MAC Studio Fix NC15.
  • Taupe powder. MAC
  • Highlighter. MAC Soft and gentle.
  • Cream blusher. Sleek California.
  • Mascara. Lancome Hypnose lash.
  • Brow pencil. MAC Brunette.
  • Lip balm. 

To start off prep your face this is crucial you do not skip this step as this will make your skin look and feel fressshh! Exfoliate scrub those sins away, cleanse, tone and lastly moisturize.

 Apply a bb cream or tinted moisturizer I use a duo fibre brush to blend it as I feel this really blends into the skin leaving no traces of makeup ever being there. Bb creams or tinted moisturizers are a lot more sheer and illuminating giving you a youthful look, ideal for mature skin. 

Apply a light coat of concealer over your blemishes and under the eyes and under the brow bone this will brighten your eyes .

Apply a highlighter of your choice above the cheekbones and down the center of your nose, this will help make your face look radiant.  

Comb through your brows and lightly feather on your brows using your favorite brow pencil to make them look  more full, we do not want to create a scouse brow remember let's keep it natural.

Apply a brown eyeliner (or a brow pencil) under the lower lash line and blend it out so it frames the eyes this will also make your eyes appear slightly bigger.

Lightly apply a contour colour preferably one that doesn't have an orange undertone, to create a shadow underneath your cheek bones, this will exaggerate your cheekbones. 

Dab on a teeny bit of cream blush on the apples of the cheek.

Add a few coats of mascara. And dab on some lip balm you should look like you were born with it!


I hope this helps anyone wanting to achieve this look for less.

With Love MakeupMonster X

Sunday, 18 January 2015

Glitter bombing.

Ever heard of the saying all that glitters is not gold? Well these geniuses have taken it to the next level. What's hard to get rid of? Sticks to everything in sight? And sparkles? It's not a joke (sorry) it's glitter! www.shipyourenemiesglitter.com has gone viral, the idea of sending the people you dispise glitter has made the world go ape . Instead of getting bitter just get your enemies glitter. This company delivers a glitter bomb to your enemies so they'll be finding that shit for days;leave them guessing who would do such a terrible thing? Some of us may love the idea but the person receiving your package will be a human disco ball. Make your revenge fabulous this year. 

With love makeup monster x.

Thursday, 15 January 2015

Simple black& gold eye.

You know when you haven't got much time on your hands to play around with your makeup, but want to swade from the usual brown smokey eye? I have the perfect solution not only is this look extremely easy, it also compliments every eye colour.  All you need is black,gold and a highlight colour. I created my eye look using the naked 2 palette.

  • Blackout.
  • Chopper.
  • Bootycall.


Prime the eye with your fave eye primer. Apply the black shadow on the outer corner of the eye, using a flat eye shadow brush push it onto skin. Make sure you tap the fallout off the brush before putting it on your face it is your worst nightmare. 

Apply your gold shade on the middle of the lid, again apply a few layers of shadow for a more intense look.

Push a highlight shade on the inner corner of the eye and on the inner corner of your bottom lash line.

Using  a fluffy blending brush blend, blend, blend until the colours look smooth as if they are about to emerge. Whilst blending you can create the eye shadow shape, you can take it above the socket, on the socket where ever you feel it compliments your eye shape. I find bringing the shadow to the outer edge of your brows lifts the eye.

To finish the look off you can go under the eye with the black shadow and smudge it out. Finish off with some black liner in the water line and some falsies. 


Contouring and highlighting will help make your look more sultry and defined, if you are unsure here's how I do it http://makeupmonsterblog.blogspot.co.uk/2015/01/how-to-contour-highlight.html.

  I finished my look off with nude lips, to help draw attention to those peepers.

With Love Makeup monster X.

Friday, 9 January 2015

How to contour & highlight.

Contouring and highlighting seems to be an ongoing makeup trend; and a secret that every celebrity makeup artist uses to sculpt your face and make the most of your unique facial structure.  Recently made popular  by none other than Kim Kardashian. Contouring and highlighting is a technique I feel is sometimes overused, and can look dreadful if it is not applied correctly. Let's reminisce on that time Nicki Minajs makeup artist forgot to blend her nose... Lets not re-live that.
site:najlakaddour.com
But when operated with skill, can be your deadliest weapon; literally you could cut someone with that structed jawline. The secret behind it? Using the correct shades, technique and knowing your face shape. With a lot of practice and alone time with your face, you can be a sculpted beauty in no time.

Here's a little guide I put together that I hope helps anyone looking to start, or just curious as to how I apply my makeup..

  • Know your face shape.
www.instructables.com


Some are born with a chiseled jaw and strong cheekbones but we can't all be Kiera Knightley.   Knowing your face shape is as important as knowing your g-spot. If you don't know it, you never will! Knowing your face structure means you'll know what features you need to sculpt.  A good example would be a round face shape, you will want to contour under the cheekbones quite dramatically with plenty of blending. This will give the round face more structure. Some face shapes may need more highlight than contour.

  • Choosing the right products.

This is of great importance. Knowing your skin type, what sits and blends well with your skin. Personally I have always preferred cream concealers; I feel they blend better on my skin and are buildable. You have a wide variety of choice you can use foundations, concealers, grease paints and powders. Choose wisely.

  • Finding that perfect shading tone and highlighter.

Being taught makeup professionally I have always been told to choose a shade three shades lighter than your skin tone, and a shader a couple of tones darker. Okay, personally I do not stick to this when I go dark I go dark. I tend to only go a few shades lighter with my concealer as there is usually a believable contrast (I also fake tan this means you can afford to go darker).  Stay clear of products with an orange or red tone trust me it will end in tears.

  • Choose your tools wisely.

Personally I like angled sturdy brushes to contour and highlight. The application is a lot more precise; as you can control the angle of the brush and the quantity of the product you are applying. To blend I would recommend no other than the beauty blender. It blends the makeup seamlessly it does all the hard work for you. Make sure you practice your blending. Blending is an art form do not underestimate it. You need to apply little pressure otherwise you will smudge the contour to another part of your face changing the facial features again, which could make them droop or bigger.

Now we've got that out of the way, here's how I contour and highlight.


  • Apply the light shade of product on the center of the forehead, the center of the nose,under the eyes. above your cheekbones, under the brow, and on the crossbow.
  • Using the shading product, I apply it at the sides of my forehead, on the temples, along the sides of my nose. below my cheekbones, in the socket of my eye and in the point of my chin

  • I then blend using a beauty blender, this blends cream products beautifully. I blend until I cannot see any harsh lines and my face looks more sculpted.
  • To finish off the look apply your favourite smokey eye and nude lip.


How do you contour and highlight? Or for you first timers tell me how it went!


With love Makeup Monster x


Tuesday, 6 January 2015

The tan every girl needs.

 If there's one thing I know about us girls is that we love a  golden tan, it makes us look and feel good inside and out. The problem is we live in England and it's winter which means we have to find a sunless solution;sunbeds take too long to build up, and are a health hazard. So in our time of need we turn to fake tan. Fake tan is extremely problematic. 


1.     It's hard to find one that has natural colouring.
2.     It goes streaky and patchy.
3.     It smells like chicken crisps.
4.     It leaves the skin looking scaly after a day.


Sally Hansen.

I dont know about you but I love a quickie... An instant tan, that does exactly what it says on the tin. An instant natural glow, streak free, scent free and waterproof the perfect combo. This tan is a virtual photoshop it leaves your skin looking airbrushed exactly like it says on the tin. I think I have hyped it up enough and now it's time to reveal my little tanning secret- Sally Hansen tights in a tin (£9.99 Boots) is the answer to your fake tan sorrows. The reason the tan seems so flawless is because unlike other tans it is makeup based meaning it imitates and conceals the skin instead of staining it. Just spray onto the skin and blend with a tanning mitt for a streak free glow that lasts all night.

Anvia.

I was feeling extremely brave and decided to trial a cheaper version of the tan Anvia  Dark ( £2.99 Savers). This also claimed to have an airbrushed effect. I do not often say this it was I was pleasantly surprised. It went on smooth, blended seamlessly on the skin, had no lingering scent. Going out with instant tan on can be a catastrophe if it's not waterproof; as someone always manages to spill your own drink down you. Resulting in a not so even tan. My tan is nightclub worthy, dozens of drinks spilt down my legs and not one streak, this tan has superpowers! Spray onto the skin and blend for that quick glow we all crave.

Pros

  • Goes on smoothly.
  • A lovely golden colour.
  • Doesn't make you smell of biscuits/chicken crisps.
  • It's instant.
  • It's waterproof.
  • You look flawless.
Cons
  • You must blend it quickly.
  • It can clog up your pores on your face.
(It tends to stay on for a few days then you'll need to lightly exfoliate your skin. It doesn't go scaly and it comes off with great ease.)

 Swatches.


 As you can see Sally Hansen is a lot thinner meaning you can build up the coverage more, it takes five minutes to dry before you can get dressed. Whereas Anvia has a more fuller coverage so once it's on the skin you usually do not need another layer, however it takes about 10 minutes to dry properly.


The two tans are extremely similar in colour and coverage. The white patches are there to show the difference. This is phenomenal tanning dupe.


I am a very hard person to please when it comes to beauty products, and these two products are a must have for every tanners beauty cupboard. I wish I had discovered it sooner. 

With love 

Makeup monster x. 


Friday, 2 January 2015

Thirsty skin?

The festive season has come to an end(cry). Not only has the majority of the nations liver taken a beating, but so has your skin! The arctic weather, the late nights, the ten too many mulled wines? Do not neglect your thirsty skin, it needs hydration too! I also know a lot of people may be avoiding checking your bank balance; "maybe if I blink twice more money will appear?" or "if I squint it doesn't look too bad".  That's why I have put together some budget skin melodies for you, that I promise won't break the bank. Lets quench this thirst.


Vaseline.
This is a no brainer,the greasy ointment is a quick fix solution. It's best to wear this over your dry areas over night let it sink into your skin. Unless you like the "I'm about to be deep fat fried" look.


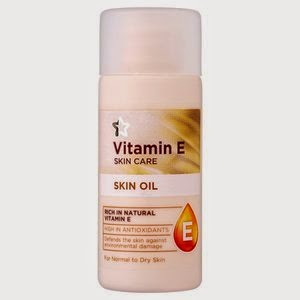
Vitamin E skin oil.
 The ultimate bargain.This product does a little more than help speed up the process of hydrating your skin. It protects and revitalises the skin. I tend to wear skin oils instead of moisturises during the the winter as I feel my skin needs extra hydration.I tend to apply the oil around my eyes and mouth before I apply my makeup. If you do not like having a dewy finish on your skin I  would recommend using a matte primer and a little powder when using this product under makeup.
 
www.superdrug.com
Baby oil Aloe Vera.
If my skin is incredibly dry and I must wear makeup, to remove my makeup I simply use baby oil with Aloe Vera. Aloe Vera is proven to be repairing for skin hence why it's so lovely to our skin. Baby oil does not make my skin feel sensitive; I like to let my skin absorb this product. Try not to use it everyday as you may break out in those pretty little things- spots.
newbuy.ca


Lancome, Bi-oil makeup remover.
Finding a hydrating makeup remover is as important as finding a thirst quenching moisturizer. Personally this is my must have. I know,I know I said this was going to be budget buys but it will last you at least 6 months so it kind of is; I hope I have persuaded you. It not only removes your makeup it also cleanses, and adds hydration to your skin. It is also perfect for sensitive skin. I know it may be out of some peoples budgets but it really is worth the cost.(£22)


www.dfs.com


I can sense what you're all thinking, "where's the moisturisers?" I will happily answer that, personally I find moisturisers dry out my skin and don't really improve my skin at all, I need a deeper solution, ointments and oils. A lot of moisturisers are full of alcohol and sometimes contain harsh chemicals which may improve the appearance at first but is it really helping your skin? These products have really helped my skin survive winter season.


With Love Makeup Monster x.

Thursday, 1 January 2015

Light up your life

Want gleaming goddess skin? You have come to the right place;as here I have posted my fave highlighters that are a must have.

 If there's one thing I know it's how to spot a good highlighter. After searching high and low,for that perfect glow. I have tested a lot of products. I want to share with you my favourite brighteners. Highlighters make such a difference to your makeup its one of those finishing touches I cannot live without.


Like all makeup there are different finishes and consistencies for your highlighter. It's all about finding the glow for you.

Kryolan event foundation Pearl. £30

I thought I would get the unexpected out of the way. This big beauty(50ml) is Kryolans event foundation in Pearl. It is a light weight transparent formula that sits beautifully on the skin.  I  use it  as a multi use product, I mix it in with foundations for a glow.,I use it as a eyeshadow primer and a highlighter. It gives an intense, pure glow. I would recommend this shade for pale skin types only-it is available in darker shades. Just dab a pea sized amount onto the skin and blend it out for an angelic glow.

MAC Lustre Drops-Pink Rebel(£18)
The sequel to my fave liquid highlighters MAC Lustre drops Pink Rebel. Ideal for mixing in with your foundation for a more dewy finish, I tend to use a flat sponge and dab onto the areas I want to shine. It also looks stunning mixed in with some powder blusher.
The Body Shop illuminator (£12)
If the other liquid highlighters are slightly out of your budget then I have just the solution for you. Body shops illuminator is more of a thicker substance than the above. But is still in my top three of liquid highlighters. It does the trick. You do have to work this one into the skin more but it still leaves your skin gleaming beautifully.

MAC Frost-Pearl.
As you can see this is used a lot when creating my makeup. Unlike the others it is a cream highlighter. MAC Frost- Pearl. This sits effortlessly onto he skin without blending just needs to be pressed onto the skin preferably with a finger and voila you are a glowing godess.It looks more dewy than shimmery which I love it lasts for hours ad is my ultimate life saver if my skin is looking slightly dry.

MAC Skinfinish Mineralize- Soft and Gentle.
This highlighter is perfect for those with oily skin types. MAC Mineralize skin finish. I use a flat brush and press it into the skin. It catches the light beautifully. Again it's not too shimmery so perfect for day and night makeup. I tend to use powder highlighters to set my liquid highlighters on a night out if I want a more dramatic look. You can get this in many shade to suit every skin tone.

MUA Undress your skin (£3)

If you're new to highlighters or if you're curious about powder highlighters but don't want to risk splashing out on a product you may not warm to. I would recommend trialling Superdrugs  MUA Undress your skin highlighter. I cannot praise this product enough. It is highly pigmented, sits beautifully on skin and gives a shimmery glow. This product is also available with a gold undertone for you beauties with olive toned skin. It's £3  grab bargain.

Swatches.


There are of course millions of highlighters, but here are my personal favourites that I cannot praise enough!


With Love Makeup Monster x.